Strawberry Rhubarb Streusel Cake

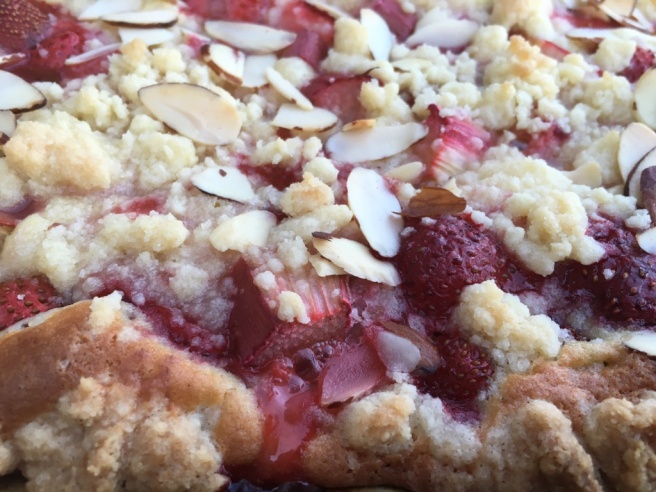
Rhubarb again, you might say! Yes, this time with its favorite buddy – strawberry and all enveloped in a tasty batter with scrumptious topping of streusel and almond slices.

IMG_1103

You will love this spring/summery dessert and especially if you are baking for a large crowd. In no time you’ll have a large baking sheet of super tasty, fruity goodness.

This is me, using a large rhubarb leaf from my garden as a fan. 😀

IMG_1084

Strawberry Rhubarb Streusel Cake

[Printable recipe]

Ingredients:
• 450 g (200 + 250) or 7 oz + 8.8 oz flour
• 400 g (150 + 250) or 5 oz + 8.8 sugar
• 2 packs (1 + 1) vanilla sugar (or 2 tsp [1+1]vanilla extract)
• 400 g (150 + 250)or 5 oz + 8.8 butter
• 1 pinch of salt
• 500 g (1.1 lb)rhubarb
• 800 g (1.7 lb)strawberries
• 4 large eggs
• 75 g (2.6 oz) corn starch
• 3 tsp baking powder
• 75 g (2.6 oz) sliced almonds
Prepare streusel:
For the streusel combine qty of ingredients marked bold in the ingredient list – flour, sugar, vanilla, salt and cut in butter with a pastry blender or hand until it resembles coarse crumb. Cover and place in the fridge.

Streusel

Cake:
1. Wash rhubarb, pat dry and cut into 1.5 cm or ½ inch pieces. Wash strawberries and split them into halves if small and into quarters if bigger.
2. For the batter combine the remaining butter (or half qty of butter, half cream cheese), remaining sugar and vanilla. Mix at high speed until creamy. Add one by one egg making sure they are well mixed into batter.
3. Combine remaining flour, corn starch and baking powder and stir well. Lower the speed and add the flour mixture.
4. Spread the batter onto a large baking pan covered with parchment paper. I’ve used 13 X 17 inches which is about 33 X 43 cm.

Strawberry Rhubarb Cake 1
5. Place rhubarb and strawberries on the top of the batter. Sprinkle with sugar (if desired). Now spread streusel over it and finally almond slices.

Strawberry Rhubarb Cake 2
6. Bake at 200 C or 395 F 30-35 minutes. Remove from the oven, let it cool and serve. You may want to sprinkle with powdered sugar before serving.
ENJOY!

IMG_1098

IMG_1099


IMG_1104

Rhubarb Meringue Cake

It’s rhubarb season and this year rhubarb in my garden has been growing like crazy! Over the weekend I picked five stalks, two of which weighed almost a pound. I was searching for a good rhubarb dessert recipe and finally decided to go with this one, which I adapted from a German website.IMG_0936FullSizeRender

I love rhubarb, but because of its tartness I often pair it up with strawberries. Other recipes with rhubarb only, seem to call for a huge amount of sugar, which I try to avoid as often as possible. This cake, even though with rhubarb only, has a perfect balance of tart in the sponge part and then sweet in the meringue top. It tastes heavenly and I will be making it again this rhubarb season.

I tried to go a little fancy with piping the meringue on the top, but it can be just simply spread over the cake. If you choose to do the piping, I’d suggest to add one more egg white because I ran out of it (one corner of the cake didn’t have meringue on, but I was embarrassed to show it… :D)

IMG_0978

Rhubarb Meringue Cake

[Printable recipe]

Ingredients:
• 800 g (1 ¾ lb)Rhubarb
• 1 TBSP sugar
• 125 g (4.4 oz) Sugar
• 125 g (4.4 oz) Butter (room temperature)
• 1 Pack vanilla sugar (or 1 tsp vanilla extract)
• 1/2 Lemon (zest only)
• 1 Pinch of salt
• 3 Large eggs (divided)
• Sugar*** (for meringue – see step 6.)
• 1 Whole egg
• 100 g (3.5 oz) Corn starch
• 100 g (3.5 oz) All-purpose flour
• 2 tsp Baking powder
• 2–3 TBSP Milk
Preparation:
1. Wash and dry rhubarb stalks and cut into ½ inch pieces. Sprinkle with 1 TBSP sugar and set aside in a bowl.
2. Divide eggs and place the egg whites in the fridge.
3. Place butter in a mixer bowl, add sugar, vanilla, salt and lemon zest and mix until fluffy, then add 3 egg yolks and 1 whole egg and mix until is all well incorporated.
4. In another bowl combine flour, corn starch and baking powder and mix well. Start adding it to the egg mixture alternating with milk. The batter will turn out really nice and creamy.
5. Prepare a 13 X 9 inch baking pan. Brush the sides with butter and place parchment paper on the bottom. Place the batter into the pan, spreading evenly. Now place the rhubarb on the top. Bake at 395 F (200 C) for about 25 minutes.

Rhubarb Meringue Cake
6. While cake is baking take the egg whites out of the fridge and weigh them. The weight of your egg whites will determine the quantity of sugar you will need. (My egg whites weighed 108 grams, so I measured 108 g sugar for my meringue). I learned that by using the same quantity of egg whites and sugar I get the best meringue.

IMG_0971
7. Beat the egg whites on high gradually adding sugar for about 3-4 minutes or until soft peaks form. If you turn your bowl upside down they will stay in place.
Meringue

8. When cake is done, take it briefly out of the oven. Lower the oven temperature to 250 F (120 C). Spread or pipe the meringue on the cake and bake it for another 20-25 minutes.
9. Let it cool and serve.

ENJOY! 🙂

IMG_0973

IMG_0979


Savory Muffins with Queso Fresco

Queso Fresco Muffins 2

Hello Friends, I hope everyone is doing well! 🙂 Spring is my favorite time of the year, I feel inspired to paint, bake and do all sorts of creative projects around the house. I made these savory muffins last Sunday for breakfast and they were a hit with my family. They are easy to make and you can have them on the table in less than an hour. They go well with butter, pate, cream cheese, jam or even just plain they taste wonderful. I imagine adding some bacon bits into batter would work great. Instead of Queso Fresco you can also use Feta cheese or any crumbly cheese. I absolutely loved the taste and the texture and will be making them again soon.

Savory Muffins with Queso Fresco

{Printable recipe}

  • Yields 12 muffins

Ingredients:

*** Use dry measure cup for all ingredients

  • 4 eggs
  • 1 ½ cup plain yogurt
  • 1/2 cup oil
  • 2 TBSP butter (melted)
  • 3 cups all-purpose flour
  • 2 ½ tsp baking powder
  • 1 tsp salt
  • 5 oz Queso Fresco (or Feta cheese) finely crumbled

Preparation:

  1. Beat eggs, yogurt, oil and melted butter at a high speed until smooth.
  2. Combine flour, baking powder and salt and mix well.
  3. Lower the mixing speed and slowly add all dry ingredients into the egg mixture.
  4. At the end mix in Queso Fresco.

Queso Fresco Muffins

5. Brush the muffin form with melted butter.
6. Fill the batter into 3/4 of the muffin forms.
7. Bake at 400 F (200 C) for about 20-25 minutes.

IMG_1493

Here they are right out of the oven:

IMG_1494

And on the table:

IMG_1496


IMG_1499

Easy Oven Roasted Potatoes

Hello Dear Friends,

Today I wanted to talk about potatoes. I am sure everyone has their favorite recipe and the way of making them. I love them really in any way, shape or form and these have always worked the best for me when it comes to taste and texture – soft inside and crispy on the outside. They are super easy to make and I hope they will soon make an appearance at your table too! Have a wonderful week! 🙂

IMG_1440

Easy Oven Roasted Potatoes

{Printable recipe}

Ingredients:

  • 2.5 – 3 lb (1.1 – 1.4 kg) Russet potatoes
  • 1/2 tsp salt
  • Fresh ground black pepper
  • 1 tsp dried rosemary or a few twigs fresh rosemary
  • 2 TBSP olive oil
  • 2 TBSP grated parmesan cheese

Preparation:

  1. Peel potatoes, wash them well.
  2. Slice each potato once through starting at the narrower part, to get two halves
  3. Slice each half into 3 wedges.

Picture1

4. Place the wedges into a pot and cook them for just about 5 minutes. They are to remain firm.
5. Strain and arrange them on a baking sheet covered with parchment paper.
6. Spice the wedges with salt, black pepper and rosemary.
7. Brush with olive oil and toss it all together so the spices and oil can spread evenly over potatoes.

Picture2

8. Sprinkle with parmesan cheese (if desired) and stir once again.
9. Bake at 400 F (200 C) until bottom of the potatoes start getting a nice golden-brown color.
10. Now turn on the broiler for 5 minutes on low and then a few minutes on high.
11. Cool for a few minutes and serve as a side dish or just by itself.
YUM! ENJOY! :)

IMG_1438

IMG_1439


Blueberry-Lemon Bundt Cake

A few days ago I went through my freezer to see what we need to use up soon and came across a whole bunch of blueberries which reminded me of the fun times last summer when my daughter and I went blueberry picking. I think we ended up with around 9 pounds and that’s not including the ones we ate while picking. 🙂

Blueberry picking

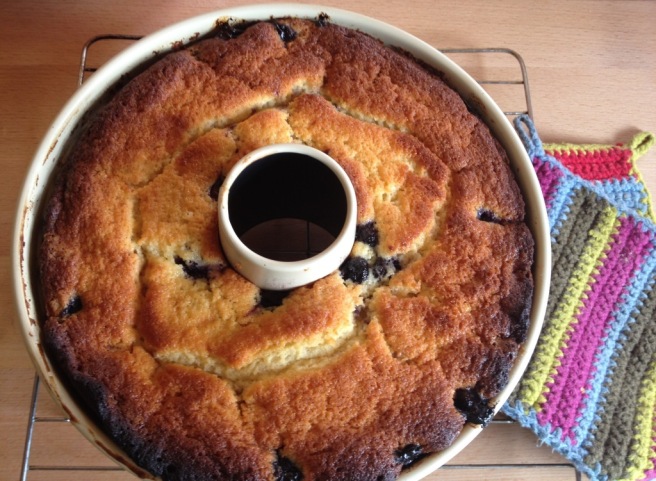
Anyway, I decided we needed to use some of those soon and what a better combination than blueberry-lemon. Recently a friend gave me a nice, new bundt cake form, so I got an idea to make a blueberry lemon bundt cake. It turned out really good, moist and not too sweet!

IMG_1344

Blueberry-Lemon Bundt Cake

[Printable recipe]

Ingredients:

  • 250 g (8.8 oz) unsalted butter (softened)
  • 350 g (12 oz)sugar
  • 1 vanilla sugar (or 1 tsp vanilla extract)
  • 1 tsp lemon extract
  • 1 lemon (zest and juice)
  • 4 eggs
  • 300 g (10 oz or 2 1/3 cup) flour
  • 3 tsp baking powder
  • 200 g (7 oz) sour cream
  • 500 g (about 1 lb) blueberries

Preparation:

  1. Slice butter into thin slices and place into a mixer bowl.
  2. Gradually add sugar and vanilla sugar and beat until fluffy.
  3. Now add lemon zest, lemon juice and extract and mix well.
  4. Start adding eggs, one at a time until well incorporated into batter.

cake preparation 1

5. Lower the mixing speed.
6. Combine flour and baking powder and start adding to batter alternating with heaping tablespoons of sour cream until all is used up.
7. Butter your bundt cake form.
8. Pour the batter into 3/4 of the form
9. Spread the blueberries on the top of batter. During baking they will sink into batter. (I used frozen blueberries)

cake preparation 2

10. Bake at 195 C or 385 F for about 1 hour or until middle sets and gets a nice golden brown color.
11. Cool completely before slicing and serving.

Enjoy! 🙂

IMG_1341

IMG_1346

IMG_1348


Breakfast Kifle

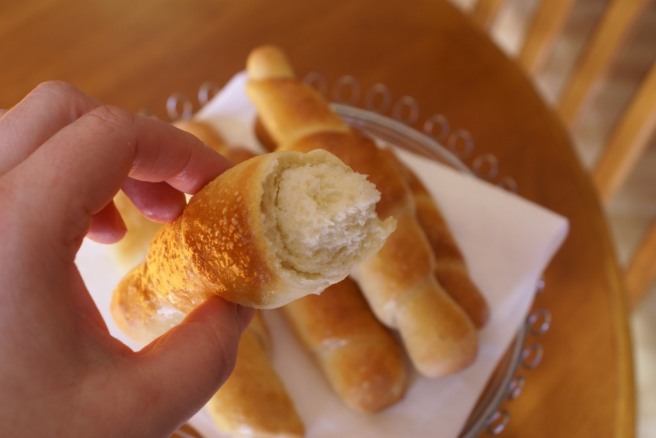
Kifle (sing. kifla) are one of the most popular Bosnian breakfast breads. In the US kifle are known as a Christmas pastry filled with walnuts, but in Bosnia, kifle are actually any type of bread or pastry made in a shape of a crescent and today I wanted to introduce the most loved and known kind.

Kifle

Every Bosnian bakery or a grocery store sells kifle. They are always fresh, airy and super delicious. They are usually served at breakfast with variety of spreads such as butter, paté, cream cheese, jam, honey, nutella, etc. Sometimes we slice them length-wise and make sandwiches or they can be served instead of bread at a lunch or dinner table.

They are made out of most simple ingredients, found in every pantry and can easily be prepared at home. I usually make them for a weekend breakfast when everyone is home and can take time to enjoy them.

BREAKFAST KIFLE

[Printable recipe]

Ingredients:

  • 650-700 g (about 5 cups) all purpose flour
  • 1 envelope active dry yeast
  • 1 TBSP sugar
  • 2 tsp salt
  • 300 ml (1 + 1/4 cup) warm water
  • 200 ml (about 1 cup) warm milk
  • 50 ml (1/4 cup) oil

+

  • 1 egg white (lightly beaten)
  • Salt for sprinkling
  • Butter (melted) for brushing

How to prepare:

  1. Combine all dry ingredients in a mixer bowl and start mixing slowly
  2. Combine water, milk and oil and while mixer is on slow, start adding liquid to the bowl with dry ingredients.
  3. Increase the speed to medium and mix for 3-4 minutes
  4. Now let it rest for about 5 minutes and then mix again 3-4 minutes. Kifle dough is supposed to be medium firm. If it’s too soft, add more flour.
  5. Dust your working surface with flour, remove the dough from the bowl and knead it by hand 10-20 times. Place it back into the bowl, cover with a kitchen towel and let it rise until double in volume (about 1 hour).
  6. Kifle preparation 1Divide the dough in two. Roll each piece into a 45 cm (18 inch) circle. With a pizza cutter, cut each circle once vertically, once horizontally and twice diagonally to get 8 triangles.
  7. Kifle preparation 2To form a kifla, first fold in both corners at a short side of the triangle. Now pressing down roll the bread until the end tip. You can also shape it to look like a crescent. Place it onto a greased baking sheet with the end tip facing down. Repeat will all remaining triangles.

Kifle preparation 3

8. Cover them and let rest and rise for about 30 minutes.
9. Heat your oven to 400 F (200 C).
10. Lightly beat an egg white and brush over bread.
11. Sprinkle each kifla with salt.

Kifle preparation 4

12. Bake about 15-20 minutes or until golden brown.
13. Remove from the oven, brush with melted butter and cover for 10 minutes.

?????????????????????????????

?????????????????????????????

Kifle

?????????????????????????????

?????????????????????????????

Enjoy! 🙂

Beef Stew with Rutabaga

This is a stew the way my grandma made it; very simple, no fancy ingredients here. It just takes time and Love to make it perfect. My grandma usually made the stew with potatoes and sometimes also with rutabaga which is in my language called “repa”. She would also shred rutabaga and pickle it, or just peel it, cut into thin slices and give it to grandchildren to eat it fresh because it’s healthy.

You will notice this not being a conventional way of preparing a stew (no meat searing); still it works wonderfully and the end result is an amazing combination of tender beef, delicious vegetable and hearty soup.

Beef stew with rutabaga

Beef Stew with Rutabaga

[Printable recipe]

Ingredients:

  • 2 TBSP cooking oil (I use sunflower)
  • 1 small onion (finely chopped)
  • 3 garlic cloves (minced)
  • 1 medium carrot (chopped)
  • 1 medium parsnip (chopped)
  • 2 lb (1 kg) stew beef (cut into large cubes)
  • 1 tsp Vegeta spice
  • 1 tsp salt
  • 1 tsp paprika
  • 1/4 tsp black pepper
  • 4 cups (1 l) water (+ a few cups more while cooking)
  • 1 lb (500 g) rutabaga (peeled and cubed)
  • Fresh flat leaf parsley

Preparation:

  1. In a heavy bottom cooking pot sauté onions, garlic, carrots and parsnips for about 4-5 minutes.
  2. Place cubed beef on the vegetable bed and let it brown well on all sides.
  3. Slightly cover pan and keep sautéing beef and vegetables together for 20-30 minutes. Beef will release juices, so just let everything slowly simmer until all liquid evaporates.
  4. Soon you will hear a frying sound. Make sure you stir well so beef or vegetables don’t burn.
  5. Now is the time to add spices: vegeta, salt, paprika and pepper. Stir once again and make sure meat is well coated with spices.
  6. Add water, bring it to boil and then turn down to medium cover and let is simmer for 2 – 2.5 hours. Some of the water will evaporate, so make sure to check the pot every 20-30 minutes to see if you need to add any water. Meat needs to be covered with water at all times while simmering.
  7. The last 45 minutes of cooking add peeled and cubed rutabaga; adjust spices if needed. Serve warm , garnished with fresh parsley.

Beef stew preparation

Beef stew preparation 2

Beef stew preparation 3

SONY DSC

Beef stew with rutabaga


SONY DSC

Cream Cheese Crepes

These are my favorite kind of crepes: filled with cream cheese and raisins, with a hint of lemon, covered with heavy cream and baked in the oven. I know, you may think what a calorie bomb, but all resistance melts away with the first bite. 😀 This is not your ordinary crepe! They can be served warm or cold and will taste just superb either way!

Cream Cheese Crepes


Cream Cheese Crepes

[Printable recipe]

Yields 12 small or 8 medium crepes

Batter:

  • 125 g (1 cup)all-purpose flour
  • 25 g (2 TBSP) vanilla sugar***
  • A pinch of salt
  • 2 eggs
  • 2 dl (1 cup) milk
  • 30 g (2 TBSP)butter (melted)
  • 1 TBSP rum or brandy

+

  • Butter for pan

*** Vanilla sugar can be purchased in most stores with an international section. If you can’t get vanilla sugar, use regular white sugar and add 1 tea spoon of vanilla extract into batter.

Cream Cheese Filling:

  • 450 g (16 oz) cream cheese (I used the one with 1/3 less fat)
  • 100 (1/2 cup) sugar
  • 1 tsp vanilla extract
  • 1/2 lemon (zest finely grated)
  • 100 g (3.5 oz) raisins (soaked in rum or brandy)
  • 250 ml (about 1 cup) heavy cream

+

  • Oven-safe rectangular baking dish

Preparation:

See pics here

  1. Combine flour, vanilla sugar and salt into a medium bowl.
  2. Add eggs and mix at a slow speed, gradually adding milk
  3. At the end add melted butter and 1 TBSP of rum.

I usually don’t use mixer for this batter; I just make sure to whisk eggs very well into the flour so the batter is smooth.

Prepare a 6 – 7 inch pan, put a thin slice of butter on the pan, let it melt and heat well. Pour a 1/2 – 1 ladle of batter onto the pan. Take the pan off the heat and move a few times in a circular motion until all batter is spread evenly over the bottom of the pan.

Place the pan back on heat and allow all batter to change color, then flip a crepe using a thin spatula or if you’re a risk taker throw it in the air and let it flip then catch with the pan. 😀

Stack a crepe on a top of another to keep them warm. I usually cover them with a piece of aluminum foil too.

For the filling, beat cream cheese and sugar at a high speed until all sugar is well incorporated, add vanilla and beat for a minute more. Mix in lemon zest and raisins by hand.

Prepare your baking dish.

Divide your filling into equal portions depending on how many crepes you have. I had 8 crepes, so I divided my filling into 8 equal portions.

Place the filling at the end of a crepe, fold over crepe from the left and right side (see below pic), then fold over longer side, roll it (as an egg roll) and place into the dish. Repeat until all filling and crepes are used up.

Pour the heavy cream over crepes. Place it in a 200 C (400 F) oven for 15 – 20 minutes or until cream starts thickening and changing color.

Serve warm or cold! Bon Appetit!


???????????????????????????????

?????????????????????????????

?????????????????????????????

?????????????????????????????

?????????????????????????????

?????????????????????????????

????????

????????

????????

Simple Crepes

Hello Friends,

It’s bee too long… I have firmly decided that this year will not be as the last. Despite being extremely busy I will find time to get back to my love of baking and sharing my recipes here with you.

This recipe is proven over and over again in my mama’s and my kitchen. It’s from an old French cookbook of 750 pages. More about it you can read here.

You would think something as simple as a crepe can not go wrong, but in my experience it really can if you don’t have a right recipe. They can turn out too thick, too though or kind of chewy. This recipe gives you a perfectly textured, thin crepe that you will want to make again and again. This time I filled them with nutella and served with some ice cream on top.

Next time I will share another way I serve them. In lack of better term I call them “Crepes au gratin”, but more about that in my next post.

?????????????????????????????

Simple Crepes

[Printable recipe]

Yields 12 small or 8 medium crepes

Ingredients:

  • 125 g (1 cup) all-purpose flour
  • 25 g (2 TBSP) vanilla sugar***
  • A pinch of salt
  • 2 eggs
  • 2 dl (1 cup) milk
  • 30 g (2 TBSP)butter (melted)
  • 1 TBSP rum or brandy

+

  • Butter for pan

*** Vanilla sugar can be purchased in most stores with an international section. If you can’t get vanilla sugar, use regular white sugar and add 1 tea spoon of vanilla extract into batter.

Preparation:

  1. Combine flour, vanilla sugar and salt into a medium bowl.
  2. Add eggs and mix at a slow speed, gradually adding milk
  3. At the end add melted butter and 1 TBSP of rum.

I usually don’t use mixer for this batter; I just make sure to whisk eggs very well into the flour so the batter is smooth.

Prepare a 6 – 7 inch pan, put a thin slice of butter on the pan, let it melt and heat well. Pour a 1/2 – 1 ladle of batter onto the pan. Take the pan off the heat and move a few times in a circular motion until all batter is spread evenly over the bottom of the pan.

Place the pan back on heat and allow all batter to change color, then flip a crepe using a thin spatula or if you’re a risk taker throw it in the air and let it flip then catch with the pan. 😀

Stack a crepe on a top of another to keep them warm. I usually cover them with a piece of aluminum foil too. When they are all done, flip the whole stack over and start spreading them with your favorite filling; jam, honey, nutella, nuts, apple butter just to name a few.

Serve warm! Bon Appétit!

Crepes preparation


?????????????????????????????

Fancy Flower Rolls

These fancy rolls are not only beautiful, but they taste like a little piece of Heaven. They are probably one of the best I’ve ever had and I will be making them over and over again. Even after a few days they keep soft, which is not always the case with homemade rolls. As of their taste, they remind me somewhat of brioche. I also had them split and toasted like a bagel and they were great. I imagine they will look beautiful on any Holiday table and will be gone in a matter of minutes! Have a wonderful weekend friends! 🙂

Fancy flower rolls

Fancy Flower Rolls

{Printable recipe}

Ingredients:

  • 1 cup (236 ml) warm milk
  • 1/2 cup (118 ml) warm water
  • 1/4 cup (50 g) sugar
  • 2 tsp dry yeast
  • 1/4 cup (60 ml) oil
  • 3 ½ TBSP (50 g) butter-melted
  • 1/3 cup (67 g) granulated sugar
  • 1 tsp salt
  • All-purpose flour (approx 4 and 1/2 cups or 580-600 g)
  • 2 eggs, whites and yolks separated

Topping:

  • egg yolks + 1 tsp milk
  • Sesame seeds, poppy seeds, etc.

Preparation:

  1. First combine warm milk, water and sugar. Mix well and sprinkle dry yeast over it.
  2. Divide eggs
  3. Place egg yolks in a small bowl and cover with plastic.
  4. In a medium bowl lightly whisk egg whites, then add oil and melted butter.
  5. Combine flour, salt and sugar in a mixer bowl with dough hooks.
  6. When the yeast mixture becomes bubbly slowly pour into flour mixture and start mixing slowly. Just when combined, add egg mixture and mix until you get a compact, shiny dough ball.
  7. Brush with oil, cover with plastic and let it rest until double in volume.
  8. This dough will be really easy to work with, almost like the play dough.
  9. Flour your working surface, place the dough on it, divide in half and then each half into 12 equal parts.
  10. Lightly oil your hands, press and roll each piece into a 10 inch (25 cm) long stick, with about ½ inch (1.5 cm) diameter.
  11. Take two sticks together and swirl them around as to a get a braid.
  12. Connect the ends to form a bagel-like roll and place on a baking sheet covered with parchment paper.
  13. Preheat your oven to 385 F or 195 C
  14. Whisk egg yolks with 1 tsp of milk and brush the rolls
  15. You may sprinkle them with sesame seeds, poppy seeds or any seeds of your choice.
  16. Bake for about 25-30 minutes or until golden brown.

ENJOY!

Fancy Flower RollsIMG_0867IMG_0868

IMG_0869

IMG_0870

IMG_0873


IMG_0876Fancy Flower RollsFancy Flower RollsFancy Flower Rolls

Summer Slices

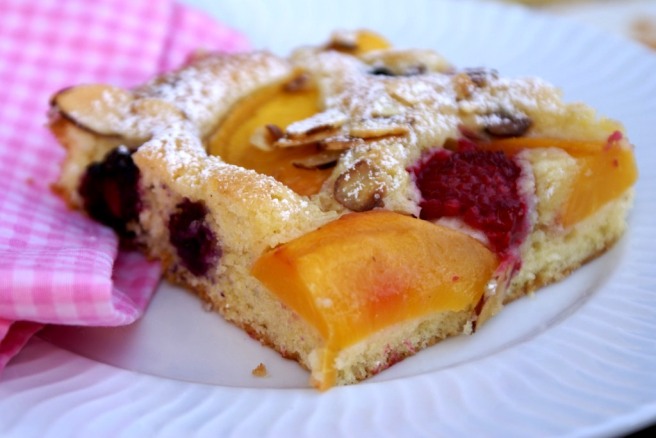
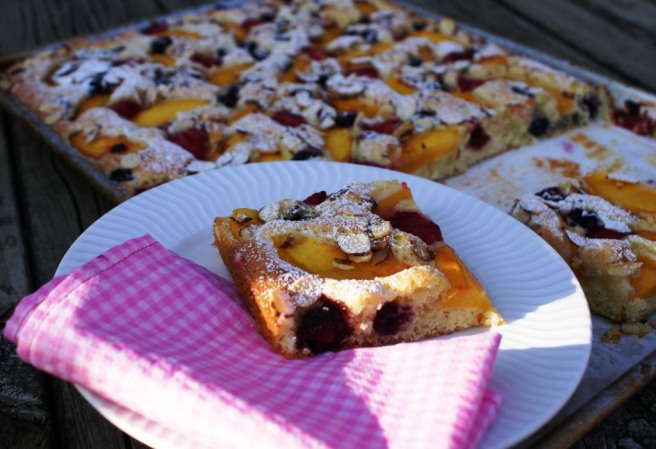
This is a nice summery dessert which I created using a batter recipe for a marble cake, minus the cocoa and instead of in a bunt cake form I baked it in large baking pan with addition of some fresh fruit on the top. I call it Summer Slices for every piece has a nice amount of summer fruit and berries and it looks so colorful. This cake is perfect for a family gathering or a party, it’s simple to make and super delicious!

????????


Summer Slices

[Printable Recipe]

Ingredients

  • 300 g butter (10.5 oz or 65 sticks)- softened
  • 275 g (9.7 oz or 2 ¼ cups + 2 tbsp) sugar
  • 1 pack vanilla sugar (or 1 tsp vanilla extract)
  • A pinch of salt
  • 5 eggs
  • 2 tsp lemon zest
  • 375 g (13.2 oz or about 3 cups)all-purpose flour
  • 2 – 3 tsp baking powder
  • 3 tbsp milk
  • Various fruit (peaches, plums, raspberries, blueberries, blackberries, etc.)
  • Slivered almonds (toasted)
  • Powdered sugar
  • Baking pan 32 x 44 x 2.5 cm (12 X 17 X 1 inch)
  • Parchment paper (size of the pan)

Preparation

  1. Beat softened butter, sugar, vanilla and salt until nice and foamy 1 – 2 minutes.
  2. Add eggs one by one mixing ½ minute after each addition.
  3. Mix in lemon zest.
  4. Combine flour and baking powder and stir well, then start adding to the butter mixture mixing at a medium speed.
  5. At the end add milk and stir until all well combined.
  6. Line a baking pan with parchment paper and spread the batter evenly on the pan.
  7. Lightly toast slivered almonds and set aside.
  8. If you use peaches you will need about 4 large. Boil some water and immerse peaches into boiling water for about a minute. Peel them and slice into thin slices (about 1.5 cm or 1/2 inch).
  9. Spread them on the batter, sprinkle with berries and toasted almonds
  10. Bake at 195 C or 385 F until lightly brown on the top.
  11. Let it cool down and sprinkle with powdered sugar. Cut into slices and serve.
 ♦

Summer SlicesSummer Slices

Summer Slices

Summer Slices

Summer Slices

Summer Slices

Summer Slices

Summer Slices

Summer Slices

Tarhana Soup {Sour Dough Soup}

Tarhana soup is a well loved soup in my native Bosnia, as well as in some other countries such as Greece, Turkey, Albania, Bulgaria, Egypt, etc. The noodles are made from sour dough and give a soup that specific taste and tomato sauce just enhances its flavor. So, if you like your sourdough bread, I am sure you will like Tarhana as well.

My maternal Grandmother used to make the noodles from scratch. I am not quite sure of how the whole process works, but I can tell you what I remember from my childhood.

The dough is made with flour, water, salt, possibly yeast (some say yogurt too, or with tomato sauce) and it’s left to ferment for 3-4 days (or more). More flour is added to the mixture each day. When the dough is ready, it is divided into hand-size patties which are then left to dry (best in the airy and sunny spot). After they’re dry they are shredded or coarsely grounded into noodles and stored in plastic containers or jars.

I buy my noodles at the store with Bosnian, Balkan or Middle Eastern products. Tarhana soup can be made in several different ways and with various ingredients. This is my family recipe.

Tarhana soup, trahana

Tarhana Soup {Sour Dough Soup}

[Printable recipe]

Ingredients:

  • 2 TBSP cooking oil
  • 1/2 medium onion
  • 1 medium carrot
  • 1/4 of a medium green bell pepper
  • 1 celery stalk (optional)
  • 1 small zucchini (optional)
  • 3/4 lb (about 350 g) ground beef
  • 1 tsp “Vegeta” spice
  • 1/2 tsp salt
  • A pinch of ground white pepper
  • 15 oz (425 g) can tomato sauce
  • 5 cups (1 liter + 200 ml) water
  • 1 cup (about 200 g) tarhana noodles
  • Chopped parsley
  • Sour cream (optional)

*** All vegetables finely chopped

Preparation:

  1. Heat the oil in a cooking pot and add all finely chopped vegetables. Sauté for 5 minutes then add ground beef.
  2. Sauté ground beef and veggies for another 5-10 minutes, then add spices, tomato sauce and water.
  3. Bring it to boil and add tarhana noodles. Stir well. Let the soup simmer for another 10-15 minutes. Stir occasionally as the noodles tend to stick to the bottom.
  4. Noodles will thicken the soup. If it’s too thick for your taste, you can always add a little water.
  5. Serve garnished with fresh chopped parsley or a tablespoon of sour cream
  6. ENJOY!

Tarhana

Tarhana soup preparation

Tarhana soup - trahana

Tarhana soup - trahana


Bosnian Pancakes {Uštipci}

In Bosnia, we love our pancakes, our bread and just dough-y things in general. 🙂 We make two basic types of pancakes. The first kind is a simpler, less time consuming and I am talking about those today. The second kind is made with yeast and I will share the recipe some other time.

My recipe may differ a bit from others, but basically there are three main components for a good pancake: eggs, flour and some type of liquid (water, milk, yogurt, buttermilk, etc.)

I make my pancakes with Greek yogurt and I really love them. They have a nice texture and they remain soft even when cold (IF there are any left). What I  love about them is that they are small, so you can grab one or two on your way out. They are a perfect bite (or two) size and make a really delicious breakfast. We spread them with variety of savory or sweet spreads or make them into sandwiches. Some people serve them coated in sugar/powdered sugar. I also had them with maple syrup and they were great, even though traditionally we don’t use maple syrup.

If you are interested in how to pronounce “uštipci”, it would sound something like “oosh-tipsy”  🙂

Bosnian Pancakes Ustipci

Bosnian Pancakes {Uštipci}

[Printable recipe]

Ingredients:

  • 3 eggs
  • 1 cup of yogurt (I like to use Greek Yogurt)
  • 1/2 tsp salt
  • 1 cup water
  • 2 cups all purpose flour
  • 1 tsp baking powder


  1. Whisk the eggs until foamy, add yogurt and mix until smooth, add salt and water.
  2. Combine flour and baking powder and start adding to the egg mixture, stirring the whole time.
  3. Batter needs to be a bit thicker than for the American pancakes.
  4. Pour cooking oil into a large frying pan just enough to coat the bottom.
  5. Set the heat to medium.
  6. Prepare a large tray and cover with paper towel.
  7. Grab a spoonful (I use soup spoon) of batter and pour onto the heated oil.
  8. Make sure pancakes have enough space to expand.
  9. When you see bubbles forming around the edges of the pancake, it’s time to turn them over.
  10. Fry them until golden brown on both sides.
  11. When done, place on a paper towel.
  12. Bosnian pancakes can be served with a variety of spreads, such as cream cheese, pâté, jam, nutella, honey, etc. You can split them and make mini sandwiches too. They are firm enough to be picked up and they are usually one or two-bites-size. They are delicious warm or cold.

Have fun making them!

Bosnian pancakes prep

Bosnian pancakes prep 2

Bosnian Pancakes Ustipci

 These are some of the ways to enjoy them:

Bosnian Pancakes Ustipci

Flourless Chocolate Cake with Caramel Almond Topping

I made this cake for my husband’s birthday. First I wanted to make his birthday favorite Julishka, but then I thought maybe this year I’d make something new and different. He likes chocolate and he also likes caramel, so what could really go wrong?!

I remembered a while ago I made a Black Forest Cake which didn’t require any flour, so I thought that would be a good start. I’ve changed a few things around: increased almond meal to 100 g and then substituted bread crumbs with organic shredded coconut.

I also remembered a cake my mom used to make with the almond caramel sauce, for which I don’t have a recipe, but thought I could recreate the sauce and pour over my chocolate cake. The cake turned out so much better than I hoped for. It has a nice texture, it’s moist and not too sweet at all. The sweetness of caramel fits really good with this cake and almonds give it a nice crunch. It’s definitely a winner!

Flourless chocolate cake with caramel almond topping

Flourless Chocolate Cake with Caramel Almond Topping

{Printable recipe}

Cake:

  • 8 eggs (divided)
  • 1 whole egg
  • 1 pinch of salt
  • 1 TBSP water
  • 1 cup (200 g) sugar
  • 1 tsp vanilla extract
  • 1.8 oz (50 g) dark cocoa
  • 3.5 oz (100 g) ground blanched almonds
  • 1.8 oz (50 g) organic shredded coconut

 Topping:

  • 1 cup (200 g) sugar
  • 6 TBSP (85 g) unsalted butter
  • 1/2 cup (120 ml) heavy cream
  • 1 cup (150 g) roasted blanched almonds

 Preparation:

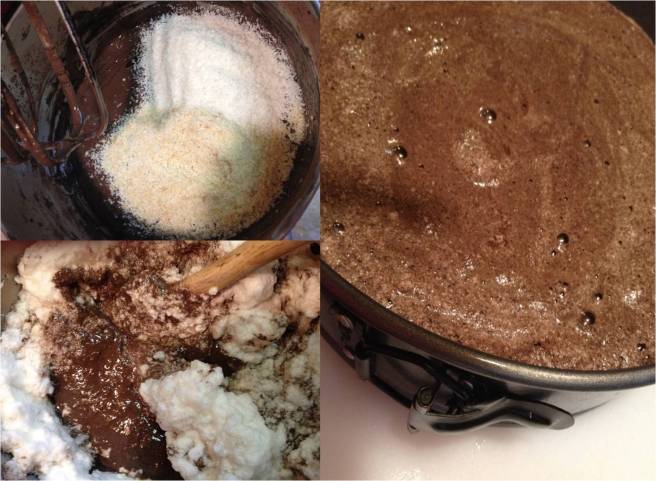
  1. Divide eggs and first beat egg whites with a pinch of salt until firm or when you turn the bowl upside down they don’t move. Set aside
  2. Now beat egg yolks, 1 whole egg, water and sugar until very pale yellow, add vanilla extract and cocoa. Make sure cocoa is well blended with eggs. Fold in almonds and coconut.
  3. At the end add egg whites and mix all together by hand until just incorporated.
  4. Pour into a round 8 inch (20 cm) cake spring form lined with parchment paper.
  5. Bake at 365 F (185 C) for about 30 minutes.
  6. While cake is baking roast your almonds until light brown and fragrant; set aside to cool.
  7. Remove the cake from the oven and cool completely and then make caramel topping.
  8. For the topping pour sugar into a heavy bottom pot and melt at a medium temperature. Have butter and cream handy.
  9. Once the melted sugar starts boiling add butter and cream at once. Lower the temperature and cook for another 5 minutes. Add roasted almonds and let it cool for about 5-10 minutes.
  10. As it cools caramel will become thicker. Pour over cake and serve. Keep the cake at the room temperature, or if keeping in the fridge remove 30-60 minutes before serving.

Bon Appetit!

Flourless chocolate cake prep 1

Flourless chocolate cake prep 2

Flourless chocolate cake prep 3

Flourless chocolate cake with caramel almond topping

Flourless chocolate cake with caramel almond topping

Flourless chocolate cake with caramel almond topping